Welcome To My Humble Blog

I create Today as a celebration of my life - jlh

I hope you enjoy my blog.
I will do my best to make it a blog you will want to come back and visit often.

Be sure to invite your friends to follow or view
my blog.
If you have any questions, please email me. Comments are always appreciated in the comment section in each post.
Have a beautiful day and always remember to share some smiles today.

Blinkie Maker
Showing posts with label masculine. Show all posts

Wednesday, May 20, 2009

Masculine Card, A "Love Life" Card and a Tutorial

Lets Call This Technique "Manipulated"
There will be more cards using this
technique to come.
You can also put a vellum or mesh over these.

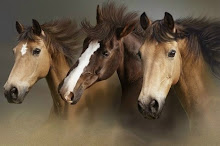
The picture below looks terrible!!! I couldn't get
a good photo for some reason. The photos above
look a little more like real life.
For the Background You Will Need:
You will need to know that you will be wasting some ink.
White glossy card stock
Alcohol inks (several colors/lights and darker colors)
StazOn or Memories ink
Very important: non stick craft mat
something to cover your work surface.
A few folded pieces of paper towel
TUTORIAL:
Try to visualize what your scene will look like.
Now realize that it will never come out exactly
like you imagined. LOL
You can do an abstract design or scenery.
I prefer scenery.
Always apply lightest color first, as in most art!
Hold card stock (over some folded paper towel) -
on an angle and apply the first color of your
alcohol inks.
***Touch the edge or corner of card stock on the
paper towel to allow the excess ink to be absorbed.
You want the ink to flow down your card,
while you manipulate where the flow goes,
by tilting your card stock to different angles.
ie: if you are doing a nature setting then you
might want to start with the sky. I would start with
Yellow and manipulate your card so that the yellow
ink only flows where you want it. Then incorporate
your different sky colors. I always use yellows, orange,
reds, purples a few different
blues, and I always use some metallic pearl mixed with
the blues. Then for the middle ground you may
want earth colors. Maybe flat or maybe you might create
some mountains.
For the foreground you might want some hilly areas.
Just use your creative imagination and see
what you come up with.
Stamp your choice of images over this background -
using memories or stazon ink.
Some will turn out better than others.
If one turns out bad then use your spellbinders
to frame the good part of it or just make butterflies out of it. lol
JUST HAVE FUN and
BE FEARLESS WHEN CREATING ART!
Hugs,
Dorothy
P.S. one day I might learn how to make a video and upload it.
Be patient!

Saturday, May 16, 2009

Thinking of You in Copper

Cuttlebug Embossed Copper SheetsI embossed the metal sheet with cuttlebug embossing
folders, Inked the edges with StazOn.
Theses cards are really easy to make.
HAVE FUN!
Happy Victoria Day Weekend!


Wednesday, May 13, 2009

Thinking of You / Funky Background

Finally!
You get so many different looks with
different backgrounds
Take a Ziploc bag and place a piece of heavy
CS inside. Make your CS just slightly
smaller to fit snug in a the Ziploc.
Now take white glue and randomly draw
a design onto the Ziploc bag.
Set aside for approx. one hour.
Then cover with different embossing
powders and heat until melted.
cut any remaining plastic away.
Have Fun! xo

Thursday, April 30, 2009

Blog Candy Closes tonight! Plus, Masculine card / background technique.....

The background:
Randomly swipe the edge of your Versa Mark pad over
Black card stock. Cover a few small areas with silver
embossing powder, Tap off. Then repeat with copper
embossing powder, tap off. Then repeat with gold.
Emboss! Don't forget to try other colors!
Hugs, Dorothy x
P.S. Check back tomorrow for a variation using this technique.

Monday, April 20, 2009

Blog Candy will close on April 30th....

Nature
Do you ever really just stop and focus on
all the beauty that surrounds you?
I used to love being in the forest/woods...
I would stop and take in all the sights,
sounds and smells of nature. Beautiful ferns,
moss on the rocks, tall gorgeous evergreens,
the sound of a stream, the sound of leaves flickering in
the wind while the birds sing you a song. Sometimes I
would write a poem. In nature I find peace.
Boy do I ever miss and need this.
I moved to a suburb/city in Ontario almost 2 years ago.
I have found it hard living in the city.
I have always had nature outside my windows and
now I have neighbors. No offence meant towards my
neighbors, but I'd rather have nature & privacy.
People say that I will adjust. I'm still waiting!
Instructions
Cut 1 piece of ivory CS to 5 1/4 x 5 1/4
Punch out a circle to create a mask for the moon
To create the sunset...With the mask in place,
ink up a sponge with yellow citrus Chalk ink and
start sweeping over and around the moon.
then apply Tangerine chalk ink to sponge and randomly
sweep this color being careful not to cover all the yellow.
Now go in with a little of the Dark Peony color.
Remove mask and stamp your grass
Cut 2 pieces of Double sided Patterned CS to 5 1/4 x 5 1/4
Then using Spellbinders Circle Dies, die cut circles in both,
making sure the background paper is one circle size smaller, as
this will create your frame. To prevent the dies from moving,
I like to use masking tape to tape down the dies before I cut.
Randomly stamp flourish.
Attach ribbon, then attach vellum to the back of this.
Put card together and attach flower and butterfly.
Hugs,
Dorothy
Stamps: Flourish-Inkadinkado, Butterfly-Hero Arts & Grass-SU
Paper: Wild Asparagus "Mother" Floral /Teal #WA3146
Vellum: unknown
Sunset ink: Color Box Chalk- Yellow Citrus, Tangerine & Dark Peony
Grass & Flourish ink: Ranger Adirondack dye ink "Bottle"


Scroll down to find the latest BLOG CANDY!


Friday, April 17, 2009

My Favorite Time of the Year!

I'm supposed to be doing summer cards right?
I always have fall in my heart!
I promise to do some summer cards next.

The right side of the back ground was done using
the direct to paper method and then randomly stamping
leaves in different colors. Emboss the leaves or use strong
colors of dye inks.
For the Left side of this card I used a fiberMark
embossed paper. Randomly stamp leaves again.
Tear edge and ink. Age the word Autumn and then stamp
and emboss the foreground leaf. (I love this magenta leaf stamp)
Add a little Color to leaf with colored pencils or markers.
Smiles,
Dorothy x

Thursday, March 12, 2009

One Stamp Wonders....

REAL EASY CARD!
I just love stamps that make my life easy!
This is a Magenta stamp that I fell in love with.
Instructions....Stamp & Layer! LOL
Gotta Love it!

Tuesday, March 10, 2009

One of The Best Free Gifts....

...IS NATURE!
I know, I know.... I should be doing Spring and Easter cards.
I love the colors of Fall and I loooooove nature!
This doesn't look as nice in the photo as it does in
front of me. Oh Well. A photogragher I'm not! LOL
All the background coloring was done using a sponge and
the direct to paper method. I used some StazOn and some
ink from one of my Big and Juicy pads by Ranger.
The tree stamp is by Inkadinkado and the Sun stamp
is by The Artful Stamper. Peel Off boarders -Magenta
Have a Wonderful Day!

Wednesday, March 4, 2009

WILD HORSES couldn't drag me away ....

I wasn't going to do any posts for a few days ...
but wild horses couldn't keep me away!
I think I am finally getting used to the Copics. I like them!

Sunday, March 1, 2009

Masculine Card....

Sorry for the poor photos
What a Wonderful Verse!
In case you can't read it, it says...
"To the world you are just one person, but to me you are the world"

The verse stamp is by Penny Black. The Dog stamp ...Unknown.

Background is alcohol inks.

Saturday, February 28, 2009

Need Some Soothing?


When I lived in Vancouver, I never felt more peaceful in my life!
Nature is so soothing!
The sound of a stream flowing...
Moss on the rocks....
Ferns everywhere
The sound of leaves flickering in the breeze...
The chirping of the birds....
The crickets and tree frogs at night....
The smells of nature, specially after it rains...

When I am surrounded by nature, I am home!
STOP AND TAKE IN THE BEAUTY THAT SURROUNDS YOU!


Trees background is CHF Verse is IO


Wednesday, February 25, 2009

THE BEST INVESTMENT.....

ONE OF THE BEST INVESTMENTS IS NATURE!
All you have to do is invest a little care and love and you
can enjoy it's beauty forever.
It will always give back!
I enjoy the peace it offers to your soul in this crazy world!
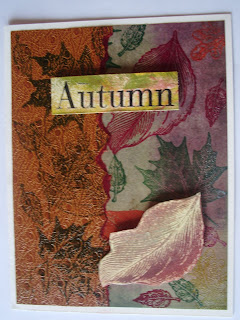
A REAL SIMPLE CARD! It's just layers of paper and a few leafs.
Butterflies are also one of natures elegant beauties that fascinate me.
Their colors and daintiness can amuse me for hours.
Background stamp - Inkadinkado (Brenda Walton)
Butterfly stamp - Unknown.
The verse stamp is Hero Arts

Friday, February 20, 2009

Goofed with Copics Once Again! LOL

I started out wanting to use my copics yesterday.
I had the great idea of embossing the images first. LOL
"This will hold the ink in place!"
NOT!
The copics seem to dissolve the embossing. grrrrrrrrr LOL
So.......it was on to plan B
I'll try again today! Wish me Luck!
P.S. I know I can go explore websites/blogs to find out how to use the things, However, I am very stubborn! See you later.
Oh, and stay turned for another interesting announcement coming up in the next day or so.
Good Luck Tomorrow! Feb 21st
Real leaves on this card

Thursday, February 19, 2009

John Lennon....I get by with a little help from my friends

This has me singing The Beatles songs! LOL
I love the Beatles!
Stamps - older Stampin Up set

Tuesday, February 17, 2009

Misc. Cards

Hero Art stamp
Dollar Bill holder. JudiKins Stamp

Masculine Card.... Sutter Stamps

Thursday, February 12, 2009

Copic Markers

Ok, I finally tried my copics! The Jury is out!
I think I need to give myself some time to get used to them. I struggled!
I bought a set called "Got to have it all." It's just like me to go all or nothing.
However, In my opinion, I didn't get it all with this purchase. I feel that these markers are very expensive for what you get. I don't feel there was enough colors in this set to blend the way that I like to blend. I will keep playing with them and keep you posted.

All Stamps used in this post are Gina K. Designs.

I have bunch of her stamps which I will start using soon.

Gina K.....You have a wonderful stamp line!


Wednesday, February 11, 2009

Dorothy's having fun!


I had fun with this one. First for the background I embossed a gold piece of paper with one of my new best friends... a Cuttlebug folder, Then for the frame I embossed a green piece of paper. (Cuttlebug) Then I cut the frame out using one of my other new best friends...my Spellbinder.
I used my gold leafing pen to line the edges. (outer and inner edges) Then with your fingers, (don't be a baby.... it washes off easily.LOL) rub the gold line before the gold leafing is completely dried. Play with the gold until you have the desired effect. You can lightly touch your fingers with the leafing pen if you need more gold. Rub-Rub-Rub! Have fun!
Oh yes, the stamped area was another little happy mistake. I messed up on the embossing when I forgot to use my embossing buddy. However, don't you think it fit in nicely on this card?


The card below was all done using my new toys (cuttlebug & Spellbinder) liquid pearls and a couple of embellishments. It was so fast and easy.

Another lovey dovey one. Couple Stamp is Inkadinkado

I normally would have chucked this next card in the garbage. I think it turned out way too busy. What do you think?

Sunday, February 8, 2009

Ultra Thick Embossing Enamel


I Stamped the image (Magenta) in pernament ink. Embossed 3 times with Ultra Thick Embossing Enamel (UT) by Ranger and then cracked it. Then I added a little ink all over. The background is a dark color wash.

Copyright Info

Copyright Info

ARTWORK, PHOTOGRAPHS, AND TEXT ON THIS BLOG ARE PERSONAL PROPERTY OF:
© NEVERENOUGHRUBBERSTAMPS
/ DOROTHY LOWE.
MY ORIGINAL WORK IS SHARED FOR PERSONAL INSPIRATION USE ONLY. CONTENT ON THIS BLOG MAY NOT BE TAKEN OR REPRODUCED FOR THE PURPOSE OF PUBLICATION OR CONTEST SUBMISSION WITHOUT MY WRITTEN PERMISSION. THANKS YOU FOR YOUR UNDERSTANDING AND SUPPORT.

Traffic counter


View My Stats